# About AA Panel
AA Panel is a simple and easy-to-use server operation and management panel.
# Installing AA Panel
Visit the AA official website (opens new window), select the AA Panel installation command suitable for your server system, and follow the official documentation of AA Panel for installation.
# Using AA Panel to Install the LNMP Environment
In AA Panel, we can install the LNMP environment with one click, that is, Linux, Nginx, MySQL, PHP.
- Log in to AA Panel. Bind your account. In the pop-up one-click installation window, select LNMP.
- If no pop-up window appears, click
Software Storein the panel menu. - Install Nginx, MySQL, PHP, and phpMyAdmin (optional) separately.
For Nginx, it is recommended to install the latest version directly, for MySQL version 8.0 is recommended, and PHP requires version 8.0 or higher.
After installing PHP, click on the software store and select the settings for the installed PHP, ensuring that the following functions are not disabled:
- symlink
- putenv
- proc_open
- proc_get_status
- exec
- pcntl_signal
- pcntl_alarm
- pcntl_async_signals
Install the following extensions:
- fileinfo
- redis
- gmp
- opcache
Note: If the installation of gmp is unsuccessful, please execute the following command (for Ubuntu/Debian systems):
apt install -y libgmp-dev
or (for CentOS/Redhat/Fedora):
yum install -y libgmp-dev
The following extensions are installed by default, but you can check them at the end:
- bcmath
- ctype
- curl
- json
- mbstring
- openssl
- pdo_mysql
- tokenizer
- xml
- mysqli
- gd
- pcntl
- sockets
- posix
# Obtaining the Program
Clone xiaomlove/nexusphp (opens new window), then switch to the latest release tag before installing, or download the latest release (opens new window) directly.
WARNING
When cloning, be sure to switch to a release to install. Do not use the latest development code!
# Uploading the Program and Configuring the Database
- In AA Panel, click
Websites, click the root directory of the corresponding website (/www/wwwroot/your domain), and enter the file management interface. - Upload your program to the root directory of the site.
- After the upload is completed, unzip it. It is important to ensure that the files are in the root directory, not in a subdirectory. Ensure that the 'public' directory is at the top level of the root directory.
- Copy
nexus/Install/installtopublic/and make surepublic/install/install.phpis there at the end.
# Configuring the Website
In AA Panel, click
Websites.Click
Add Site.Follow the prompts to fill in the domain name, select the PHP version, and the database, choose MySQL for the type, and use utf8mb4 encoding. Fill in the account name, such as: nexusphp, then click submit.
After the website is created, click the settings of the corresponding website.
Website directory: Uncheck cross-site attack prevention (open_basedir), and set the running directory to /public.
SSL submenu, select Let's Encrypt, and apply for the certificate with one click.
In the Composer submenu, select the corresponding PHP version, set the execution parameter to install, keep the rest of the settings default, then click execute.
For pseudo-static, copy and paste the following configuration:
location / {
    index index.html index.php;
    try_files $uri $uri/ /nexus.php$is_args$args;
}

# Filament
location ^~ /filament {
    try_files $uri $uri/ /nexus.php$is_args$args;
}
Set the owner of the root directory to the PHP user www. Execute the command
chown -R www:www /www/wwwroot/your domainin the terminal.If the above step is incorrect or you don't understand what it means, you can also give the entire directory 0777 permissions:
chmod -R 0777 /www/wwwroot/your domain
After completing the above preparations, opening the website domain normally will redirect to the installation interface.
# Performing the Installation
Fill in each step according to the actual situation, **be sure to choose the correct time zone, otherwise, the time will be incorrect, and there is a possibility
that the client cannot report as expected**. Click next until finished.
# Generates encryption keys for Passport
Goto the web root path, then execute the command below:
php artisan passport:keys
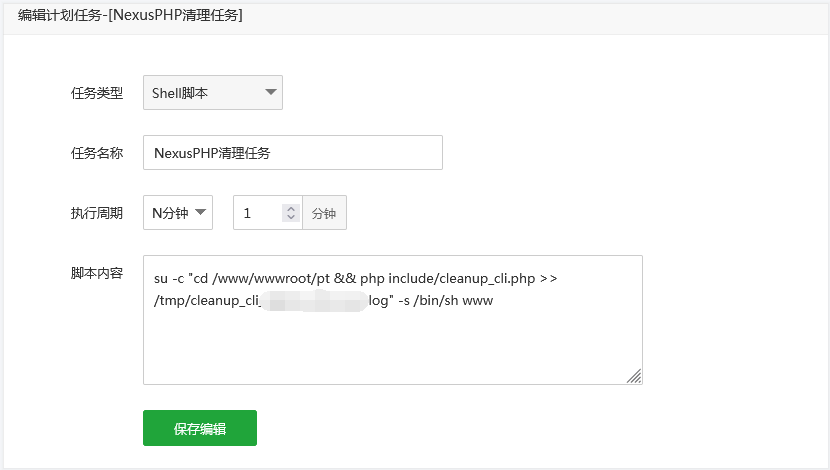
# Creating Scheduled Tasks
Click on Scheduled Tasks on the left side of AA. Create two scheduled tasks:
- Task type: Shell script
- Task name: Fill in as you wish
- Execution cycle: Every N minutes, 1 minute
The script content is as follows (remember to replace DOMAIN with your own domain):
su -c "cd /www/wwwroot/DOMAIN && php include/cleanup_cli.php >> /tmp/cleanup_cli_DOMAIN.log" -s /bin/sh www

su -c "cd /www/wwwroot/DOMAIN && php artisan schedule:run >> /tmp/schedule_DOMAIN.log" -s /bin/sh www
One example of a task is as follows (note that two separate tasks are configured, each task uses one of the above lines of script, not both lines of script for a single task.):
DANGER
Special reminder: The execution cycle is every minute and cannot be changed! The configuration here is just an entry point, the actual running frequency is controlled by the program, changing the frequency will cause the entire website to run abnormally! For example, magic power will not increase as scheduled!
After completion, delete the public/install directory. The installation log contains sensitive data; do not disclose it.
# Creating a Queue Daemon Process (>=1.8 required)
Install the Process Guard Manager from the AA Panel store, click to add a daemon process, and fill in the following format (be sure to replace ROOT_PATH, PHP_USER):
Name: nexus-queue
Startup User: PHP_USER
Run Directory: ROOT_PATH
Startup Command: php ROOT_PATH/artisan queue:work --tries=3 --max-time=3600
Number of Processes: 2
TIP
For versions 1.9 and above, use horizon instead of queue:work.
Name: nexus-queue
Startup User: PHP_USER
Run Directory: ROOT_PATH
Startup Command: php ROOT_PATH/artisan horizon
Number of Processes: 1
# Troubleshooting
If you cannot normally redirect to the installation interface, check the nginx error log.
If no errors are seen, it may be that the php-fpm error is not outputting to the nginx error log. Open www.conf (if you don't know where, try whereis php-fpm, you can see the basic directory), find catch_workers_output and php_admin_flag[log_errors], and make sure they are turned on.
Modify and restart php-fpm to take effect.
catch_workers_output = yes
php_admin_flag[log_errors] = on
If you still can't see the error, modify include/core.php around line 18, change 0 to 1, to display the errors on the page.
ini_set('display_errors', 1);
DANGER
Once the errors are fixed, be sure to set error display back to off.
# Other
# About HTTPS
It is recommended to use Cloudflare's DNS resolution service, which will provide a free SSL certificate. Under the SSL/TLS menu, choose Full or Strict for the encryption mode, create a certificate under the [Origin Server] submenu, save it, upload it to the origin server, and configure it as mentioned above in the document.